Thursday, April 20, 2017
Casting Light Through Window Blinds Photoshop Tutorial
Casting Light Through Window Blinds Photoshop Tutorial

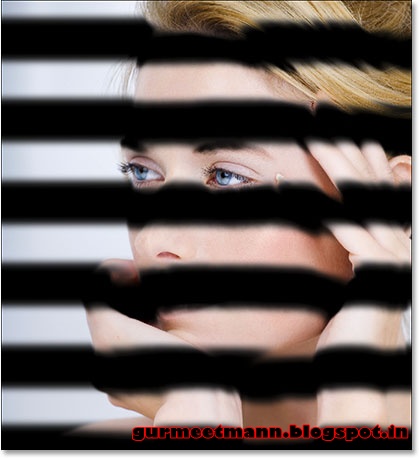
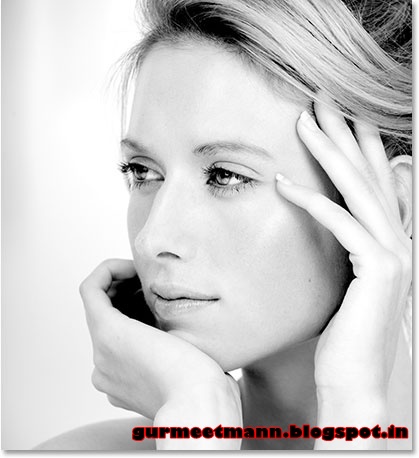
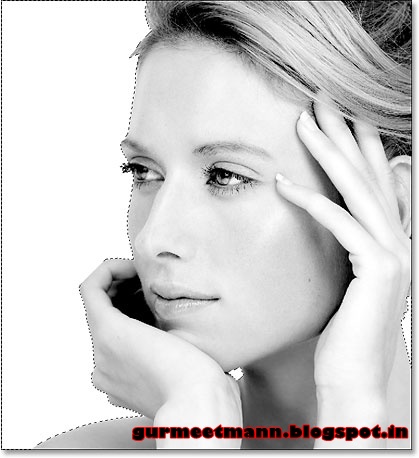
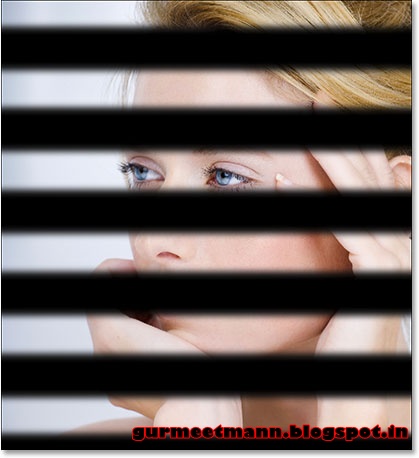
Heres the image Ill be working with in this tutorial:
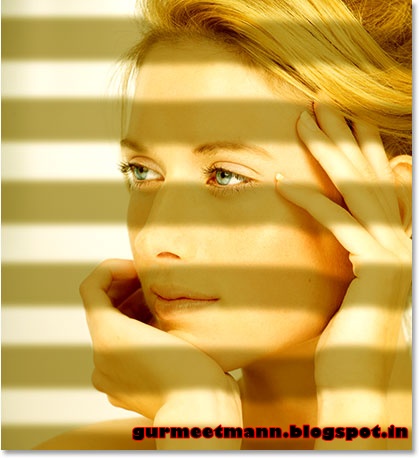
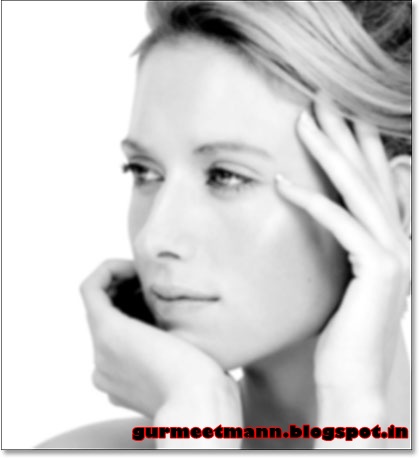
And heres how it will look when were done:
Lets get started!
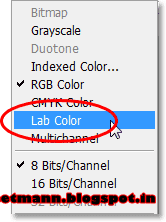
Step 1: Convert The Image Into The Lab Color Mode
As I mentioned, well be using Photoshops Displacement Map feature to wrap the shadows from the blinds around the natural curves of the womans face, hands and hair, so the first thing we need to do is create our displacement map. A displacement map is nothing more than a black and white image which Photoshop uses to determine how to move and reposition pixels. I like to think of it as Photoshop moving pixels from "dis place" to "dis place". The first thing we need to do then is create a black and white version of our image. Theres lots of different ways to do that, but one of my favorite ways is to use Photoshops Lab color mode, which conveniently separates the luminosity (lightness) values of the image from the color.
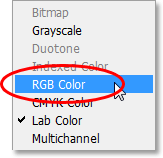
To convert the image to Lab color, go up to the Image menu at the top of the screen, choose Mode, and then choose Lab Color from the list:
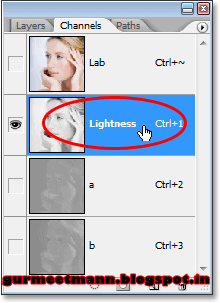
Step 2: Select The "Lightness" Channel
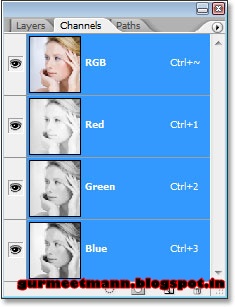
When you convert your image to the Lab color mode, nothing will seem to have happened to it in your document window, but something has most definitely happened. Weve now separated the lightness values from the color in the image, and to see exactly whats happened, switch over to your Channels palette, which youll find grouped in beside the Layers palette. Youll see four channels listed - "Lab", "Lightness", "a", and "b". The "Lightness" channel contains all of the lightness values in the image, while the colors have been separated into the "a" and "b" channels. The top "Lab" channel isnt really a channel at all. Its just the composite of the Lightness and color channels.
Click on the "Lightness" channel to select it:
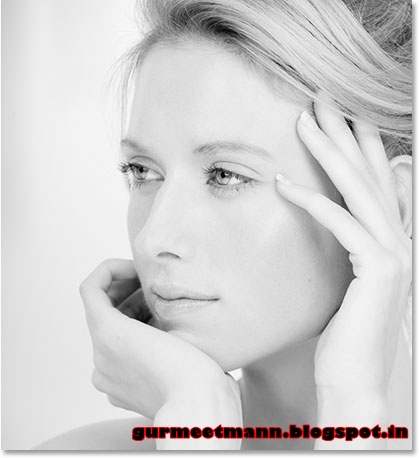
As soon as you select the "Lightness" channel, youll see your image in the document window change to black and white:
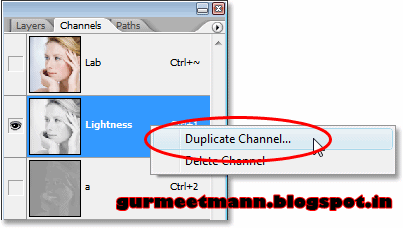
Step 3: Create A New Document From The "Lightness" Channel
We need our displacement map to be a separate document from our original image, so Right-click (Win) / Control-click (Mac) directly on the "Lightness" channel in the Channels palette and select Duplicate Channel from the menu that appears:
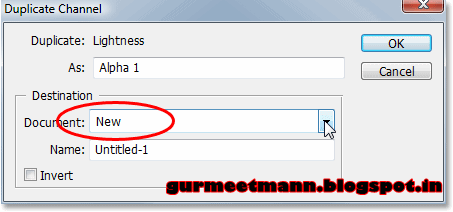
This brings up Photoshops Duplicate Channel dialog box. Change the Document option to New so we create a new document from the channel rather than simply duplicating the channel in the same document, then click OK to exit out of the dialog box:
Youll now have two documents open on your screen, one containing the original image and one containing the duplicate "Lightness" channel. Were going to work on the duplicate "Lightness" channel document for a few minutes to prepare it for use as our displacement map.
Step 4: Increase Image Contrast With Levels
Displacement maps tend to work best when the image youre using as a displacement map has a strong amount of contrast to it, so lets boost the contrast of our new document using Photoshops Levels command. Use the keyboard shortcut Ctrl+L (Win) / Command+L (Mac) to quickly bring up the Levels dialog box.
In the center of the Levels dialog box, youll see a large black graph called a histogram which shows us the current tonal range of the image. Below the histogram are three small sliders - a black slider on the bottom left, a white slider on the bottom right, and a gray slider in the middle. Click on the black slider and drag it towards the right until youre just beyond where the left edge of the histogram begins. This will darken the darkest parts of the image. Then, click on the white slider and drag it towards the left until youre just beyond where the right edge of the histogram begins. This will lighten the lightest parts of the image:
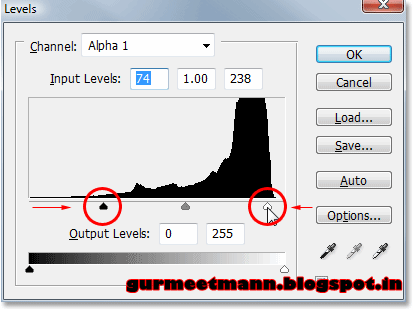
Click OK when youre done to exit out of the dialog box. Your image will now appear with stronger contrast:
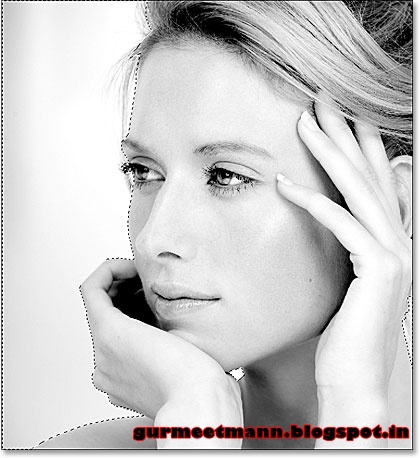
Step 5: Select The Area Around The Subject
For my image, I want the shadows from the window blinds to bend and wrap around the womans face, hands and hair, but I dont want the area behind her to be affected by the displacement map. I want the shadows from the blinds to remain perfectly horizontal in those areas, as if the light from the window is shining onto a flat wall behind the woman. To prevent the displacement map from bending the shadows in those areas, Im going to fill those areas with solid white. To do that, well need to select them, so use the selection tool of your choice (Lasso Tool, Pen Tool, etc.) to select everything around the woman. In other words, select everything except for her. Dont worry about selecting around any lose strands of hair, since they wont make a noticeable difference in the effect:
Step 6: Fill The Selection With White
With the area around the woman now selected, go up to the Edit menu at the top of the screen and choose Fill, or use the keyboard shortcut Shift+F5. Either way brings up Photoshops Fill dialog box. Set the Use option in the top half of the dialog box to White:
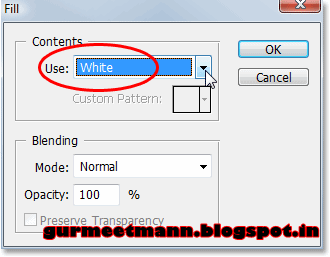
Make sure the Mode option is set to Normal and the Opacity option is set to 100%, then click OK to exit out of the dialog box and fill the selection with white:
Press Ctrl+D (Win) / Command+D (Mac) to deselect the selection.
Step 7: Blur The Image With The "Gaussian Blur" Filter
Were almost done preparing our image for use as a displacement map. The only thing left to do is remove any harsh transitions between light and dark areas by applying a small amount of blur to the image. For that, well use Photoshops classic Gaussian Blur filter. Go up to the Filter menu at the top of the screen, choose Blur, and then choose Gaussian Blur. This brings up the Gaussian Blur dialog box. Drag the Radius slider at the bottom of the dialog box to the right to increase the amount of blurring. Im going to set my Radius value to around 4 pixels, which softens the image nicely. For a higher resolution image, try somewhere around 6-7 pixels:

Click OK to exit out of the dialog box. Heres my image after applying the Gaussian Blur filter:
Step 8: Save The Image As A Photoshop .PSD File
At this point, were done with our displacement map image. All we need to do now is save it, so press Ctrl+S (Win) / Command+S (Mac) to quickly access Photoshops Save command. Since this is the first time were saving the file, Photoshop will pop up the Save As dialog box instead, allowing us to name the file, choose a file type, and decide where we want to save it. Ive created a folder on my desktop called "Displacement Maps" so Im going to save the file in that folder. Ill name it "window-blinds-displace", but of course you can name your file whatever makes sense to you. Finally, make sure you save the file as a Photoshop .PSD file, since those are the only files we can use as displacement maps:
You can close out of the displacement map document once youve saved it, since we no longer need to have it open.
Step 9: Convert The Original Image Back To RGB Color
Now that weve finished working on our displacement map, we can start creating our window blinds effect in the original image. Before we do that though, we need to convert the image from Lab color back to RGB color, which is the color mode it was in initially. To do that, go back up to the Image menu at the top of the screen, choose Mode, and then choose RGB Color:

As soon as you switch back to RGB color, youll see the color return to your image:

If you look in your Channels palette, youll see that the "Lightness", "a" and "b" channels have been replaced with a "Red", "Green", and "Blue" channel, and the composite "Lab" channel at the top has been replaced with a composite "RGB" channel:
Switch back over to the Layers palette at this point, since we no longer need to work with the individual channels.
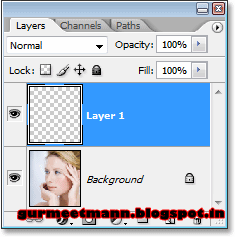
Step 10: Add A New Blank Layer
Were going to create our window blinds on their own separate layer, so click on the New Layer icon at the bottom of the Layers palette:
This adds a new blank layer named "Layer 1" above the Background layer, which is the layer that contains our original photo:
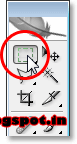
Step 11: Select The Rectangular Marquee Tool
Were going to create our first window blind shadow. Since the shadows will be long, narrow rectangles, the easiest way to create them will be to use the Rectangular Marquee Tool, so select it from the Tools palette or simply press M on your keyboard to select it:
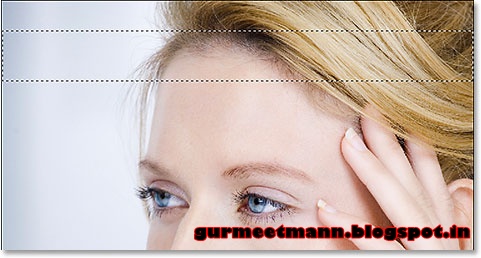
Step 12: Drag Out A Thin Rectangular Selection Horizontally Across The Image
With the Rectangular Marquee Tool selected, drag out a narrow selection across the image from left to right, somewhere near the top:
Step 13: Fill The Selection With Black
Once youve dragged out your selection, go back up to the Edit menu at the top of the screen and once again choose Fill. Were going to fill our selection with black, so set the Use option to Black:
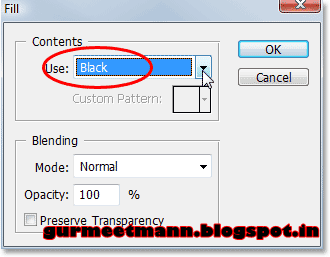
Click OK to exit out of the dialog box and Photoshop will fill the selection with black:

Step 14: Select The Move Tool
Weve drawn our first window blind shadow, even though at the moment it looks like nothing more than a black rectangle. Before we do anything fancy with it, lets use this first rectangle to create the rest of our shadows. First, select Photoshops Move Tool from the Tools palette, or simply press V on your keyboard:
Step 15: Drag A Copy Of The Black Rectangle Below The Original
Were going to create a copy of this first rectangle and drag it below the original, and we can do both of these things at the same time. With the Move Tool selected, hold down your Alt (Win) / Option (Mac) key. Youll see your Move Tool cursor change into two arrows, one black and one white. This tells us well be creating a duplicate of the rectangle as we drag it. Hold down your Shift key as well which will force us to drag the rectangle straight down, preventing us from accidentally moving it sideways. Then simply drag down with your mouse and as you drag, youll see that youre dragging out a duplicate of the black rectangle rather than dragging the original. Make sure you still have your selection active around the original rectangle before you begin dragging, since this will keep both rectangles on the same layer. Position the new rectangle below the original where you want the second shadow to appear:
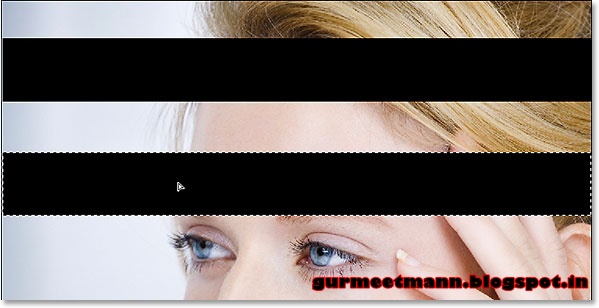
Step 16: Continue Dragging Out The Rest Of The Shadows
Continue dragging out duplicates of the rectangle all the way down the photo until you have all of your shadows created, then press Ctrl+D (Win) / Command+D to deselect the selection. Your image should now look something like this:

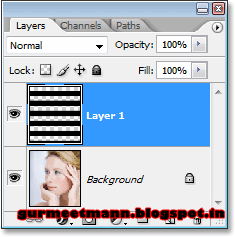
If we look in our Layers palette, we can see that all of our rectangles are on the same layer, "Layer 1":
Step 17: Apply The "Gaussian Blur" Filter To The Rectangles
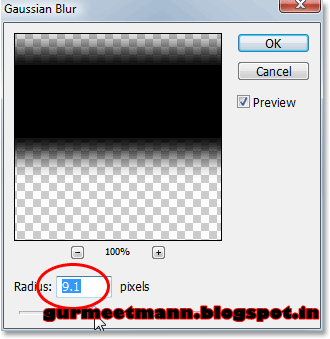
At the moment, our rectangles still look like basic rectangles. To make them look more like shadows, we need to soften their edges. For that, well use the Gaussian Blur filter once again. Go back up to the Filter menu at the top of the screen, choose Blur, and then choose Gaussian Blur. When the Gaussian Blur dialog box pops up, drag the Radius slider at the bottom towards the right to blur and soften the edges of the rectangles, just like we did a moment ago when we were preparing our displacement map image. Im going to drag my Radius value to around 9 pixels. We can see in the preview area of the dialog box that this softens the edges nicely:
Click OK to exit out of the dialog box when youre done. Heres my image with the edges of the rectangles now much softer:
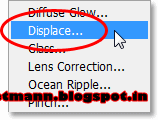
Step 18: Apply The "Displace" Filter
The edges of the rectangles now look better, but the shadows still dont look realistic. One of the reasons, besides the fact that theyre completely blocking the photo underneath them from view, is that theyre simply running horizontally across the photo. To give them a sense of realism, we need them to be bending around the womans face, hands and hair. This is where we get to use the displacement map we created earlier.
With "Layer 1" selected in the Layers palette, go up to the Filter menu at the top of the screen once again, and this time choose Distort and then Displace:
This brings up the first of two dialog boxes for the Displace filter. This first one lets us decide how much of an impact the displacement map will have on the image, and we do this by entering values for the Horizontal Scale and Vertical Scale options. The higher the values, the further Photoshop will move the pixels. In our case, we dont need to move the pixels horizontally at all, so enter 0 for the Horizontal Scale option. We do need to move them vertically, so enter a value of around 20 for the Vertical Scale option. You may need to experiment with this value to see what works best with your image. Make sure that you have the Stretch To Fit and Repeat Edge Pixels options selected as well:
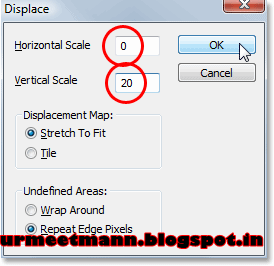
Click OK to accept your changes and exit out of this first dialog box. Well choose our displacement map next.
When you click OK to exit out of the first Displace filter dialog box, Photoshop pops up a second dialog box, this time asking you which file you want to use as the displacement map. Navigate to where you saved the displacement map file on your computer and select it:
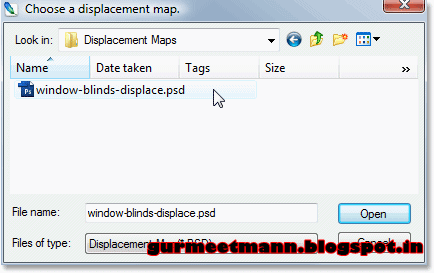
Click Open to exit out of the dialog box and have Photoshop apply your displacement map to the shadows, which now bend and wrap much more realistically around the woman: