Monday, January 30, 2017
Cara Menyeleksi Objek Yang di Group pada Coreldraw
Cara Menyeleksi Objek Yang di Group pada Coreldraw
Cara Seleksi dan Mengedit Objek yang di Group
Misalnya saya mempunyai 3 objek lingkaran berwarna biru, hijau dan kuning, seperti dibawah ini

Lalu 3 buah objek di group maka akan ditandai dengan titik-titik kecil diluar objek, seperti ini


Go to link Download
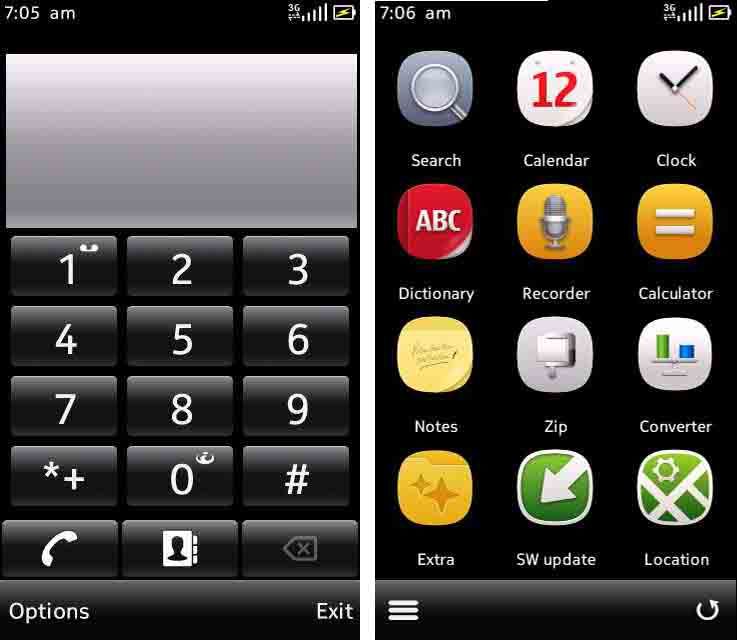
CFW Nokia 5230 and 5233 BELLE BETA Beta Released For More Suggestions
CFW Nokia 5230 and 5233 BELLE BETA Beta Released For More Suggestions


Exclusive mods added :
- belle top bar 2.1 beta
- Deskclock (run auto at start)
- no scroll bar true mod (without grid_switch app.)
- belle navibar
- ofw dialer
- qt in Z drive
- mRuntime in Z drive
- changefx in Z drive
- more changelog coming
BETA VERSION FOR Nokia 5233 RM-625 download here
CFW ini belum di test oleh saya sendiri, silahkan dicoba dan di feedback untuk teman-teman yang lain.
More Screenshots :

Shared from : http://forum.dailymobile.se/
Thanks to mr.wonderfu1 dailymobile forum member
DO IT BY YOUR OWN RISK!!
Go to link Download
Color Grid Design In Photoshop photoshop tutorial
Color Grid Design In Photoshop photoshop tutorial
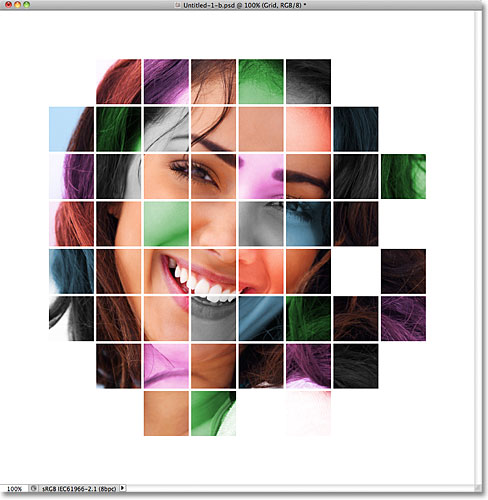

In this Photoshop Effects tutorial, well learn how to create a colorized grid design! Well use Photoshops guides and rulers to set up the initial spacing, then a couple of rarely used selection tools to convert the guides into an actual grid.
Well learn how to easily select random squares in the grid and colorize them with adjustment layers and blend modes, and finally, how to color and adjust the appearance of the grid itself!
Ill be using Photoshop CS5 throughout the tutorial, but any recent version will work.
Heres the final effect well be working towards:
Lets get started!
Step 1: Create A New Photoshop Document
Lets begin by creating a new document for the grid. Go up to the File menu in the Menu Bar along the top of the screen and choose New:
This opens Photoshops New Document dialog box. Im going to create a square-shaped document by entering 1000 pixels for both the Width and Height. Of course, you can enter whatever dimensions you need, but the effect tends to work best if you stick to a square shape. For this tutorial, Ill leave the Resolution value set to 72 pixels/inch, which is fine if youre creating this effect for the web. If youre planning on printing the final result, youll want to create a larger document and set your resolution to 240 pixels/inch or higher. Click OK when youre done to close out of the dialog box. The new document will appear on your screen:
Step 2: Show Rulers
Go up to the View menu at the top of the screen and choose Rulers, or press Ctrl+R (Win) / Command+R (Mac) to quickly turn the rulers on with the keyboard shortcut:
Step 3: Change The Ruler Measurement Type To Percent
This displays Photoshops rulers along the top and left of the document. Depending on what measurement type your rulers are set to in Photoshops Preferences, theyre probably displaying either pixels or inches. Move your mouse cursor into the rulers, either along the top or the left, then Right-click (Win) / Control-click (Mac) inside the rulers and choose Percent from the list. Youll see the rulers change to percentage increments:
Step 4: Drag Out Horizontal And Vertical Guides At 10 Percent Increments
The reason we turned the rulers on was so that we could easily add equally-spaced guides to our document, which will then become our grid lines. Lets add vertical guides first. Click inside the ruler along the left of the document, and with your mouse button held down, drag out the first guide. Use the top ruler to place the guide at the 10% mark (release your mouse button to place the guide):
Do the same thing to add a guide at each 10% increment (20%, 30%, 40%, and so on), all the way up to the 90% mark. Your document should now appear divided into 10 equally-spaced vertical columns:

Next, use the same steps to add horizontal guides. Click inside the top ruler and with your mouse button held down, drag out a horizontal guide. Use the left ruler to place the guide at the 10% mark. Continue dragging out horizontal guides at 10% increments (20%, 30%, 40%, just like before) all the way down to the 90% mark. When youre finished, you should have the same number of horizontal and vertical guides dividing the document up into a grid of squares:
With the guides in place, press Ctrl+R (Win) / Command+R (Mac) on your keyboard to hide the rulers, since we no longer need them.
Step 5: Add A New Blank Layer And Name It "Grid"
Hold down your Alt (Win) / Option (Mac) key and click on the New Layer icon at the bottom of the Layers panel:
Normally, Photoshop would just go ahead and add a new blank layer, but by holding down Alt (Win) / Option (Mac) when clicking the New Layer icon, we tell it to first pop open the New Layer dialog box, which gives us the chance the name the new layer before its added. Name the layer "Grid", then click OK:

The new blank layer appears in the Layers panel above the Background layer:
Step 6: Create A Selection From The Guides
Weve divided our document up into a grid using Photoshops guides, but the guides are just for visual reference. They wont be of any real use to us unless we somehow convert them into an actual pixel-based grid, and we can do that easily using a couple of Photoshops rarely used selection tools - The Single Row and Single Column Marquee Tools.
Click on the Rectangular Marquee Tool near the top of the Tools panel and hold your mouse button down for a second or two until a small fly-out menu appears showing you the other tools nested in behind in, then choose the Single Row Marquee Tool from the list:
As its name implies, the Single Row Marquee Tool will select a single horizontal row of pixels in the document. To use the tool, we just need to click anywhere in the document and Photoshop will automatically select the pixel we clicked on, plus every other pixel in that row from left to right. Were going to use the tool to convert the horizontal grid lines into a series of selection outlines. First, move your cursor directly over the top horizontal grid line (the one you placed at the 10% mark) and click. Youll see a 1-pixel thick selection outline appear along the guide:
Hold down your Shift key and click on the next horizontal guide below it. This will add a second selection outline to the document. Continue holding down your Shift key and clicking on all the horizontal guides until a selection outline appears along each of them. You should see 9 selection outline rows in total. Make sure you keep your Shift key held down as you click on each new guide, otherwise youll just replace the previous selection outline with the new one:
We need to do the same thing now with the vertical guides, which means we need to switch to the Single Column Marquee Tool. Click on the Single Row Marquee Tool in the Tools panel (it will appear where the Rectangular Marquee Tool icon appeared earlier) and hold your mouse button down until the fly-out menu appears, then choose the Single Column Marquee Tool from the list:
We want our vertical selection outlines to be added to the horizontal selection outlines we already have, so once again hold down your Shift key, then click on each of the vertical guides in the document until theyre all selected. When youre done, you should have selection outlines along every guide, horizontally and vertically:
Step 7: Fill The Selection With Black
Go up to the Edit menu at the top of the screen and choose Fill:
When the Fill dialog box appears, set the Use option at the top to Black, then click OK to close out of the dialog box:
This fills the selections with black, although it may be hard to see with the guides and selection outlines in the way, so go up to the Select menu at the top of the screen and choose Deselect, which will remove the selection outlines:
Then, to turn off the guides, go up to the View menu, choose Show, and then choose Guides. At first, youll see a checkmark to the left of the word Guides which tells us the guides are currently visible. Clicking Guides will remove the checkmark and turn the guides off:
With the selection outlines and guides removed, we can see our black grid on the Grid layer:
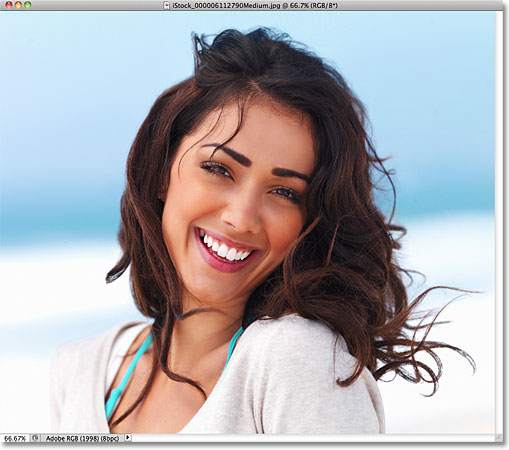
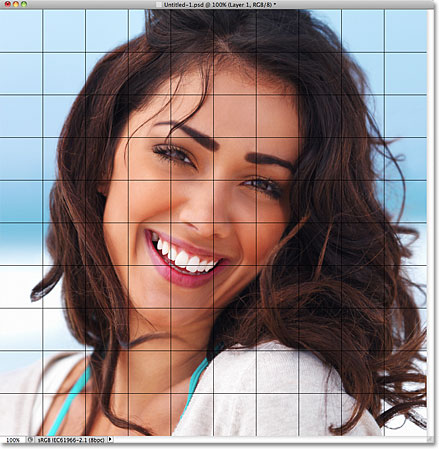
Step 8: Open The Photo You Want To Use With The Effect
Open the photo youll be using with the grid effect. Heres my image:
If youre using Photoshop CS3 or earlier, the photo will automatically open in its own floating document window. If youre using Photoshop CS4 or CS5, depending on how you have things set up in Photoshops Preferences, the photo may open in a tabbed document. If thats the case, to make the next step easier, go up to the Window menu at the top of the screen, choose Arrange, and then choose Float All in Windows (CS4 and CS5 only):
Step 9: Drag The Photo Into The Grid Document
Click anywhere inside the grids document window to make it active, then click on the Background layer in the Layers panel to select it. This way, when we drag the photo into the document, as well be doing in a moment, the photo will appear on its own layer between the Background and Grid layers:
Now click anywhere inside the photos document window to make it active and select the Move Tool from the Tools panel:
Hold down your Shift key, then click with the Move Tool inside the photos document window and drag the photo into the grids document window:
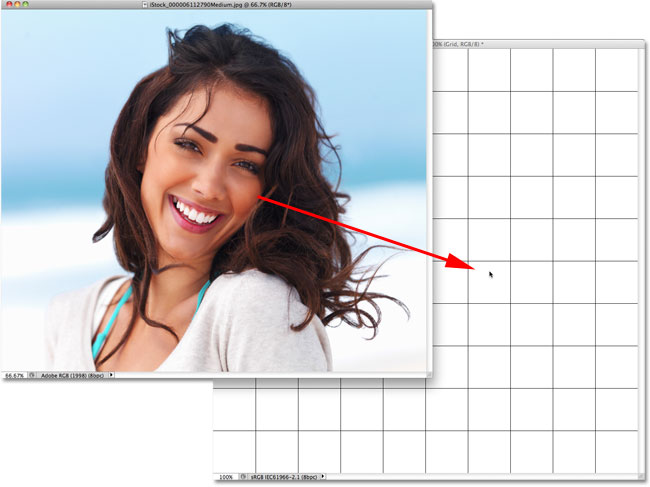
Release your mouse button, then release your Shift key, and the photo will appear centered inside the grids document window. You can close out of the photos document at this point since we no longer need it:
Notice that the grid appears in front of the photo. Thats because, if we look in the Layers panel, we see that the photo has been placed on its own layer under the Grid layer, just as we wanted:
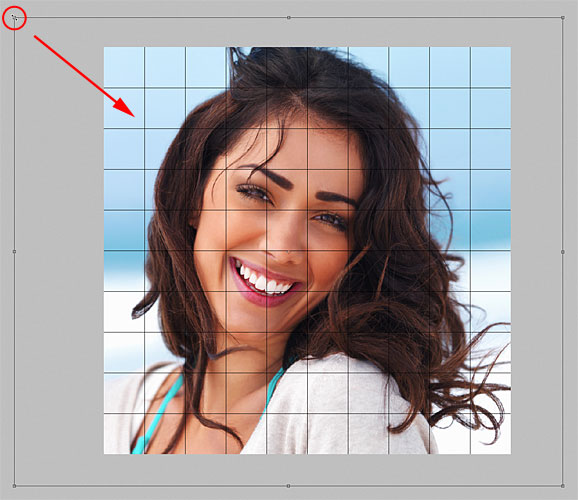
Step 10: Resize The Photo If Needed With Free Transform
If you need to resize your photo inside the grid document, go up to the Edit menu at the top of the screen and choose Free Transform:
This places the Free Transform bounding box and handles around the image. If you cant see the handles because the edges of your photo extend beyond the viewable area in the document window, go up to the View menu and choose Fit on Screen:
Photoshop will instantly zoom the image out far enough so that everything, including the Free Transform handles, fits inside the document window. To resize the photo, hold down your Shift key, then click on any of the four corner handles and drag them. Holding the Shift key down as you drag will maintain the original aspect ratio of the image so you dont accidentally distort the look of it. If you want to resize the photo from its center rather than from a corner, hold Shift+Alt (Win) / Shift+Option (Mac) as you drag any of the corner handles. If you need to move the image around inside the document, simply click anywhere inside the Free Transform bounding box and drag it into place. When youre done, press Enter (Win) / Return (Mac) to accept the change and exit out of the Free Transform command:
If you zoomed the image out a moment ago using the Fit on Screen command and want to zoom back in now that youre done resizing the image, go back up to the View menu and choose Actual Pixels (see our Zooming and Panning in Photoshop tutorial for more info on zooming in and out of documents):
Step 11: Select The Grid Layer
At this point, all the initial hard work is done. Weve created our grid, weve dragged our photo into the grids document, and weve resized and moved the photo into position. Were ready to have some fun colorizing the grid! First, we need to select the Grid layer, so click on it in the Layers panel to select it:
Step 12: Select The Magic Wand Tool
To colorize the grid, we need a way to select the individual squares, and we can do that using Photoshops Magic Wand Tool. Select it from the Tools panel. If youre using Photoshop CS2 or earlier, you can simply click on the Magic Wands icon. For Photoshop CS3 and higher, click on the Quick Selection Tool, then hold your mouse button down until a fly-out menu appears and choose the Magic Wand from the menu:
Step 13: Select The Outer Edge Squares
To select a square in the grid, make sure you have the Grid layer selected in the Layers panel, then simply click inside the square with the Magic Wand. A selection outline will appear around the outer edges of the square. To then add additional squares to the selection, hold down your Shift key and click inside the squares you want. Each new square you click inside of will become selected and added to the previously selected squares. Lets begin by selecting all the squares around the outer edge of the grid. First, click inside the square in the top left corner of the grid. A selection outline will appear around it:

Hold down your Shift key and continue clicking inside each of the squares around the outer edges of
Go to link Download
Sunday, January 29, 2017
Cara Service Kipas Angin yang Tidak Berputar dan Berdengung
Cara Service Kipas Angin yang Tidak Berputar dan Berdengung

Sebenarnya kerusakan ini timbul dikarenakan oleh laher/bearing yang sudah aus. Sehingga mengakibatkan as kipas menyentuh liner kern.
Cara Service Kipas Angin yang Tidak Berputar dan Berdengung :1. Bongkar kerangka kipas angin beserta baling balingnya. Serta buka baut yang mengikat kerangka gulungan/spul kipasangin secara perlahan dan hati2 jangan sampai kabel penghubung dengan gulungan terputus, karena akibatnya bisa fatal bila anda tidak bisa menemukan / menyambung kembali kabel yang putus.


2. Lepaskan bearing dari rumahnya, dan coba perhatikan apakah benar telah terjadi ke-ausan pada liner bearing tersebut jika benar, berarti bearing harus diganti. bearing ini banyak dijumpai di pasaran dan harganya pun relatif murah.


3. Setelah bearing diganti, sebelum kita menutup kembali (merakit kipas) tidak ada salahnya jika kita bersihkan semua kotoran yang menempel, caranya dengan menggunakan tiner atau bensin tapi jangan lupa sebelum dirakit harus kering dari bensin atau tiner. Yang paling utama adalah Bersihkan as kipas angin dengan kain yang bersih, kemudian berikan sedikit baby oil atau paslin (jangan terlalu banyak dan hanya asnya saja) yang terpenting permukaan as yang berhubungan langsung dengan laher/bearing terlumasi.
4. Setelah semuanya bersih dan dirangkai, kipas siap di coba..
Selamat mencoba semoga berhasil
Go to link Download
CCleaner 5 20 Crack Full Version Key Download Free!
CCleaner 5 20 Crack Full Version Key Download Free!
CCleaner 5.20 Crack Full Version Key Download Free!
Go to link Download
Cerebus In Hell Daily Strips Week 3
Cerebus In Hell Daily Strips Week 3


Go to link Download